

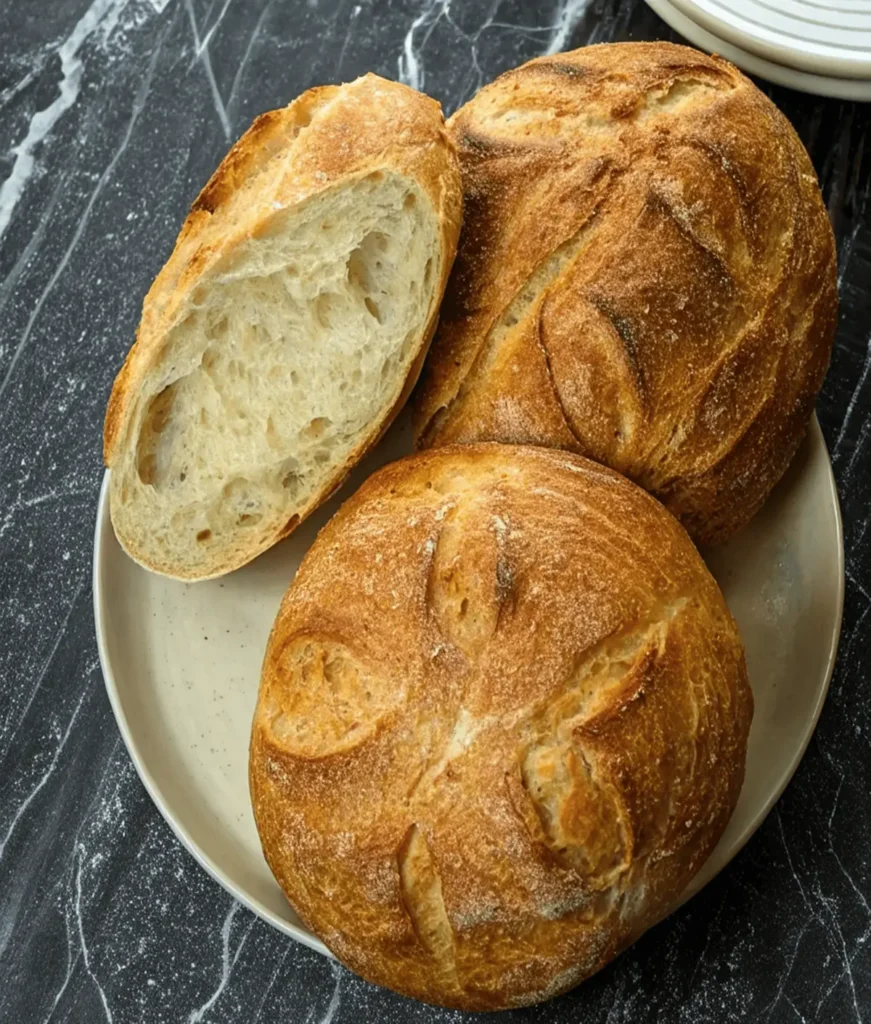
If you love the bold, tangy flavor and hearty chew of a classic Bay Area loaf, this San Francisco Sourdough Bread brings that bakery magic to your own oven. We use a simple autolyse, a covered bake, and just five core ingredients to build flavor and structure. You’ll mix once, rest, add salt, then let time do most of the work. The result is two beautiful loaves with a golden crust, an open, tender crumb, and that signature San Francisco tang. No fancy equipment required, just a Dutch oven or cloche and a little patience.
Why You’ll Love It
This bread has a thick, crisp crust and a pleasantly chewy, well-aerated crumb. The timeline is straightforward and hands-off, so most of your “work” is waiting. It’s versatile for sandwiches, soups, or just warm slices with butter. Once you try this method, you’ll feel like a pro baker in no time.
San Francisco Sourdough Bread
Tangy, chewy, and intensely flavored, this two-loaf San Francisco Sourdough Bread is simple to master. Autolyse builds strength, a covered bake traps steam, and the crumb bakes up tender and springy.
Ingredients (US & Metric)
- 150 g active organic San Francisco sourdough starter (about ⅔ cup)
- 250 g filtered water (about 1 cup plus 1 Tbsp)
- 25 g organic olive oil (about 1 Tbsp plus 2 tsp)
- 500 g organic bread flour, do not use all-purpose (about 4 cups, but measure by weight for best results)
- 10 g sea salt (about 1¾ tsp acceptable sea salt)
- Cornmeal, for dusting
Tip: Weighing is best for bread. US volume measures above are approximate.
Step-by-Step Instructions
- Mix and autolyse, 30 minutes. In a large bowl, combine the sourdough starter, filtered water, olive oil, and bread flour. Do not add the salt yet. Cover and rest for 30 minutes. The rest is the autolyse, which improves extensibility and flavor.
- Add salt and knead for about 2 minutes. Sprinkle in the sea salt and knead just until evenly incorporated.
- Expect a fragile dough. The dough will not be very elastic and may tear easily. After the bulk rise, the gluten will relax, so don’t worry about this texture note.
- Bulk fermentation. Return the dough to the bowl, cover it with plastic wrap and a dish towel, and let it rise in a warm spot until it has doubled in size. This took about 3 hours.
- Divide and pre-shape. Turn the dough onto a floured surface and divide into 2 equal pieces. The dough will deflate during this step, which is fine.
- Shape. For each piece, pat it into a rough circle, fold the edges toward the center, and then tighten it into a ball. Place seam-side up in a banneton dusted with cornmeal. Alternatively, set seam-side down directly into a cornmeal-dusted Dutch oven.
- Second rise, 1 to 2 hours. Proof until the dough feels springy and slightly puffy. It will not double again, and that’s okay. It will rise well in the oven.
- Preheat. Heat the oven to 450°F (232°C).
- Load the dough. If using a banneton, gently invert the dough into a cornmeal-dusted Dutch oven or a cloche base. Cover with the lid.
- Steam and bake. Place in the oven and immediately reduce the heat to 400°F (204°C). Bake covered for 20 minutes, then remove the lid and continue baking for 10 to 15 minutes more, until the internal temperature reaches 200 to 205°F (93 to 96°C).
- Cool completely. Remove the loaves and cool on a rack. Resist cutting the cake while it is still warm, as the crumb can become gummy.
Notes
- A warm room speeds fermentation. If your kitchen is cool, give the dough more time rather than forcing it.
- Cornmeal under the dough helps prevent sticking and adds a subtle crunch to the base.
- For clean scoring, dust the surface lightly with flour and use a sharp lame just before baking.
Nutritional Information (Estimate)
Per slice, based on 24 slices total for 2 loaves: calories, carbs, fat, and protein will vary depending on slice size and flour brand. Use a nutrition calculator for the most accurate numbers.
Variations and Substitutions
- Banneton vs. direct bake: No banneton? Proof seam-side down in a cornmeal-dusted Dutch oven, then bake as directed.
- Baking vessel options: A cloche or heavy-lidded pot works similarly by trapping steam for oven spring.
- Dusting options: You can also dust with rice flour for a non-stick finish and a lighter look.
What are my best tips for San Francisco Sourdough Bread?
- Feed your starter: Use it at peak activity for the best rise and flavor.
- Mind the proof: Look for a dough that slowly springs back when gently pressed, not a full double on the second rise.
- Steam matters: Keep the lid on for the first 20 minutes to set the crust, then lift the loaf.
- Let it cool: Cooling sets the crumb. Slice too soon and you lose structure.
Storage and Reheating
- Room temperature: Cool completely, then store cut-side down on a board or wrap loosely for up to 2 days.
- For more extended storage, freeze sliced loaves in freezer bags for up to 3 months.
- Reheat: Refresh slices in a 350°F (177°C) oven for 5 to 8 minutes, or toast to crisp the crust.
FAQ
What is the difference between sourdough and San Francisco sourdough?
All sourdough is naturally leavened with wild yeast and lactic acid bacteria. Still, San Francisco sourdough is renowned for its brighter tang and chewy texture, which result from balanced fermentation and a robust starter culture.
What’s special about San Francisco sourdough?
It delivers a bold yet clean acidity, a sturdy crust, and excellent keeping quality. The method here, with autolyse and a covered bake, helps you capture those hallmarks at home.
What are the ingredients in the original San Francisco sourdough?
Just starter, water, flour, and salt. This recipe incorporates a small amount of olive oil, which is included in the original formula, and keeps the crumb tender without muddying the tang.
What flour does San Francisco Sourdough Bread use?
Bread flour is the standard for strength and chew. Stick with bread flour here as directed for the best structure.
Finally
Two golden loaves with a crackly crust, open crumb, and that unmistakable tang, ready for soups, sandwiches, or generous slices with butter. Keep this San Francisco Sourdough Bread on repeat and enjoy bakery-style results from the comfort of your own kitchen.
Baked it? Please leave a comment and let me know how your San Francisco Sourdough Bread loaves turned out. Share a photo and tag a sourdough-loving friend. Then check out my other cozy bread recipes!

San Francisco Sourdough Bread Recipe
Ingredients
Method
- Mix and autolyse (30 minutes): In a large bowl, combine the sourdough starter, filtered water, olive oil, and bread flour. Do not add the salt yet. Cover and rest for 30 minutes. This rest is the autolyse, which improves extensibility and flavor.
- Add salt and knead: Sprinkle in the sea salt and knead for about 2 minutes, just until evenly incorporated.
- Expect a fragile dough: The dough will not be very elastic and may tear easily. After the bulk rise, the gluten will relax, so don’t worry.
- Bulk fermentation: Return the dough to the bowl, cover with plastic wrap and a towel, and let rise in a warm spot until doubled in size (about 3 hours).
- Divide and pre-shape: Turn onto a floured surface and divide into 2 equal pieces. Deflation at this stage is normal.
- Shape: For each piece, pat into a rough circle, fold the edges toward the center, then tighten into a ball. Place seam-side up in a banneton dusted with cornmeal, or seam-side down directly in a cornmeal-dusted Dutch oven.
- Second rise (1–2 hours): Proof until the dough feels springy and slightly puffy. It won’t double again, and that’s fine.
- Preheat: Heat oven to 450°F (232°C).
- Load the dough: If using a banneton, gently invert into a cornmeal-dusted Dutch oven or cloche base. Cover with the lid.
- Steam and bake: Place in oven and immediately reduce heat to 400°F (204°C). Bake covered 20 minutes, then uncover and bake 10–15 minutes more, until internal temperature is 200–205°F (93–96°C).
- Cool completely: Remove loaves to a rack and cool fully before slicing to avoid a gummy crumb.
Notes
- A warm room speeds fermentation. If your kitchen is cool, give the dough more time.
- Cornmeal prevents sticking and adds a subtle crunch.
- For clean scoring, dust lightly with flour and use a sharp lame just before baking.

Great post! San Francisco sourdough bread has a perfectly tangy and distinctive flavor